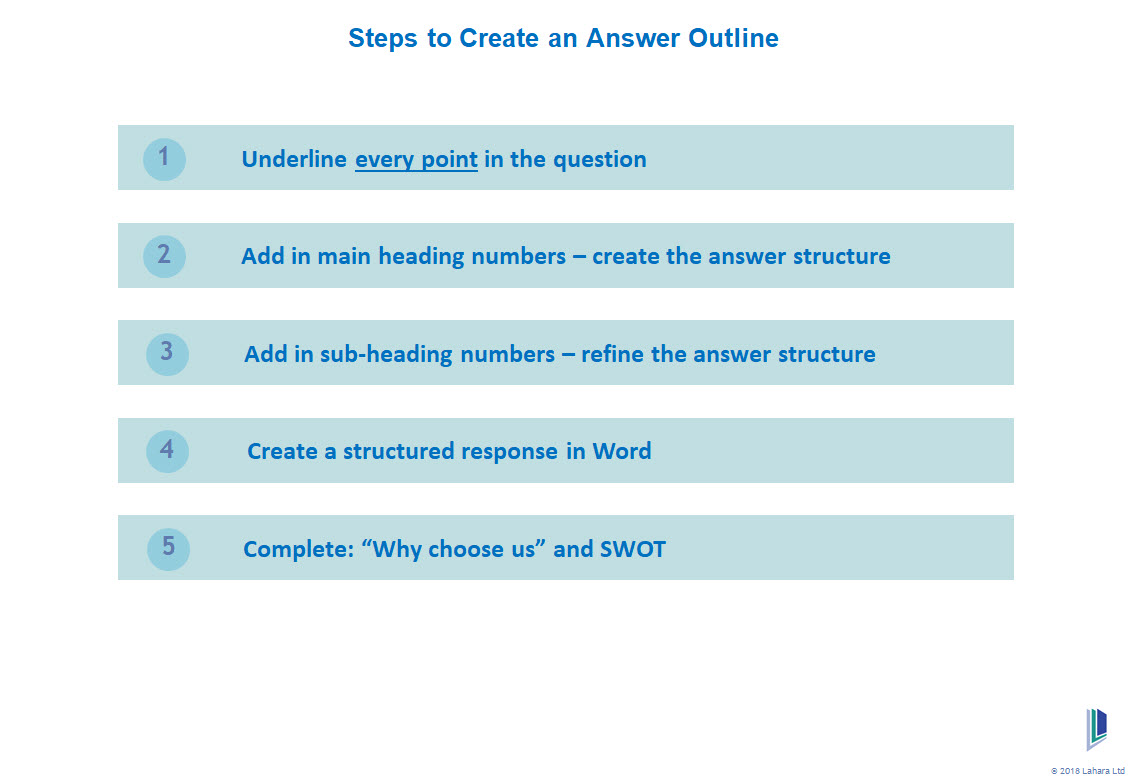
2. Steps to Create an Answer Outline
Below is the consistent repeatable process to create an answer outline:
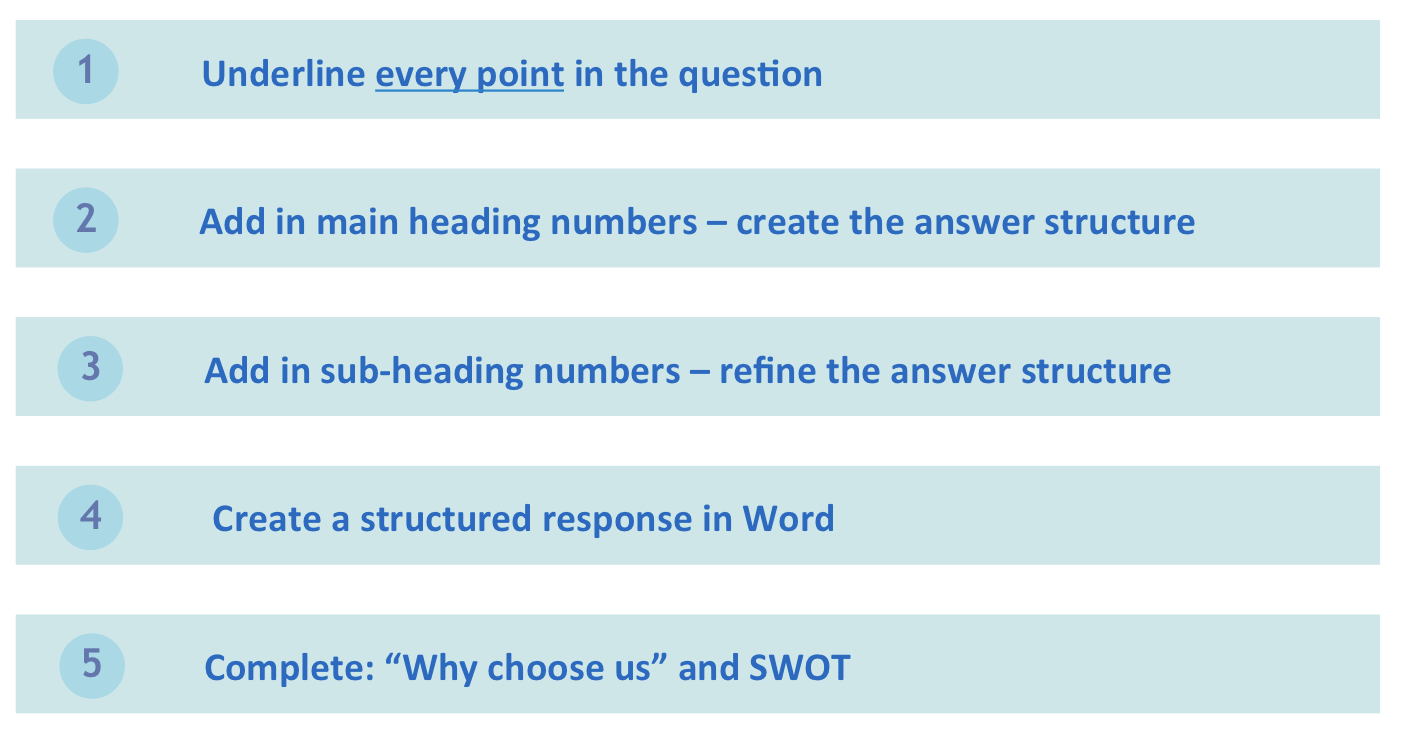
2.1 Creating an Answer Outline – A five-step repeatable process
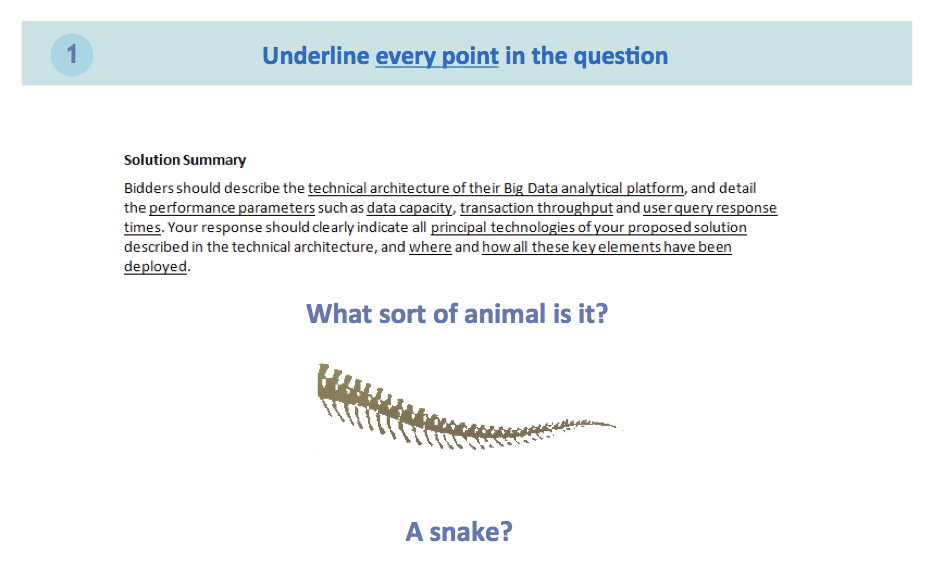
As you will remember from the training, the critical first step is to underline every point in the question. These underlined points are the start in creating placeholders for the required information.
2.2 Creating an Answer Outline – Step 1: Underlining every point in the question helps to focus your mind on absorbing the information
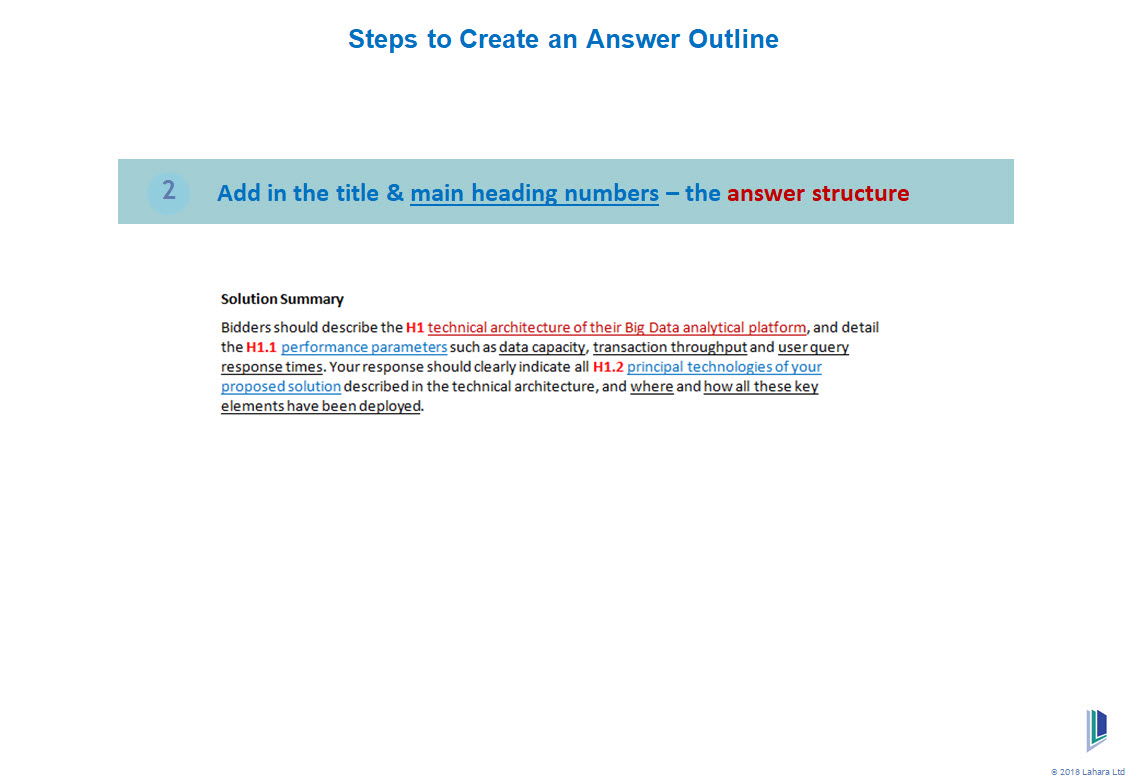
Now we create the main title for the answer, and identify and number the main headings.
I highly recommend that you create a red bold red H1, as shown below, just in front of the heading. Copy the “H1”, paste it in front of the text that will be heading H2, and then change the number to 2. Do the same for all the other level 1 headings.
Remember that sometimes there isn’t an obvious main heading, but an obvious collection of closely related sub-headings. In that case, create a main heading for those sub-headings.
Two important points to bear in mind:
1. Creating these headings is an iterative process.
Quite often, as you start creating these main headings (and later sub-headings) you will find that some of the headings are at the incorrect heading level, or they need to be with another set of sub-headings.
This is normal. Be relaxed about it. If the order or level of a heading changes, remember to re-number any relevant headings. And of course this will have a knock-on effect on any related sub-heading numbering.
2. If the heading structure doesn’t seem right, then it isn’t.
Trust your instincts. If it feels wrong, then it is wrong. As you do more and more of these answer outline headings, you will get a feel for what works, and you will find that you can do this process very quickly.
Answer outlining is an essential skill to have. It can make a huge difference to your writing efforts, so persevere with it.
Answer outlining is an essential skill to have. It can make a huge difference to your writing efforts, so persevere with it.
2.3 Creating an Answer Outline – Step 2: Add in the Title
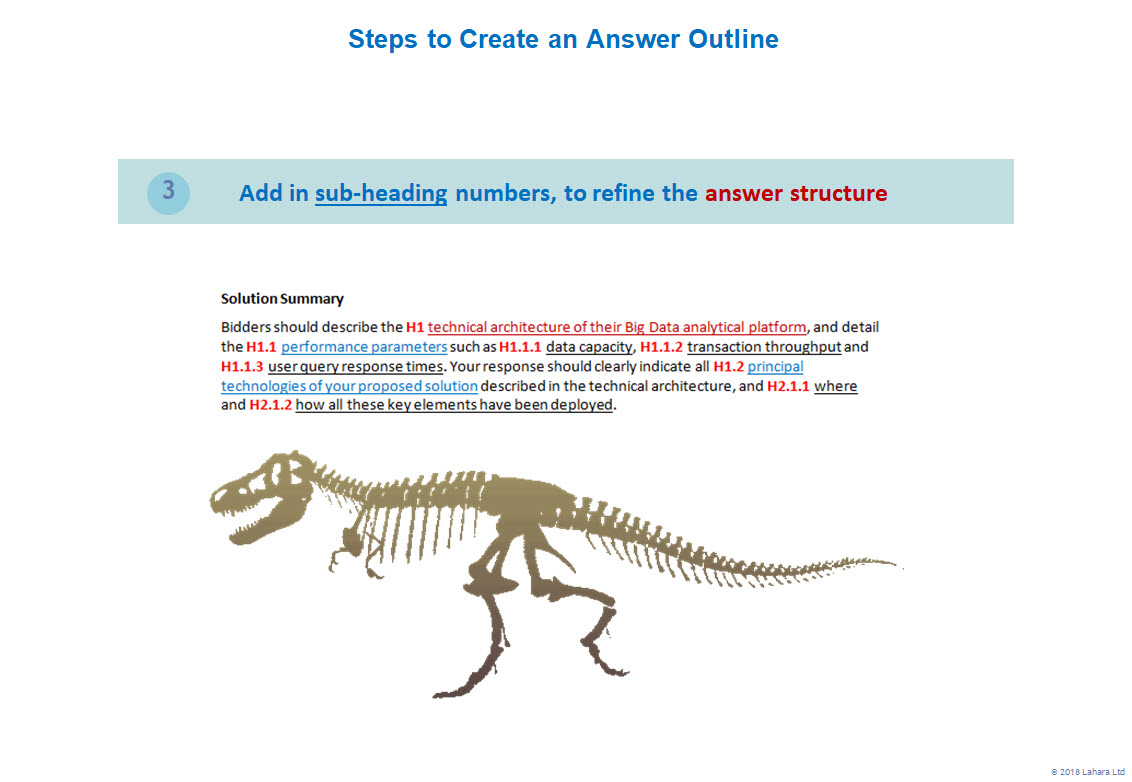
Now we identify and number the sub-headings. Create a “H1.1” heading number, and then paste that in front of all the sub-headings, and change the numbering as discussed for the H1 headings above.
This is how we create the right skeleton that will support the “answer body”.
2.4 Creating an Answer Outline – Step 3: Add in the Sub-Heading
Please also refer to this downloadable Big Data Example handout from the training
Once we have identified all the headings, sub-headings and sub-sub-headings (three levels of headings is usually the most levels you will go to), copy the entire set of headings, and paste them below the existing set of headings, giving you two sets of headings. You are now going to edit this second set, with the first set being kept for Answer Outline review (Pink Team review) to show the reviewer how you arrived at your heading numbering.
Then do the following:
- Start by setting out the main Level 1 Headings – i.e. cutting and pasting the H1, H2 etc. onto their own separate page in Word (in the example below, there is only one H1 heading)
- Apply your Level 1 Heading Word style to each heading
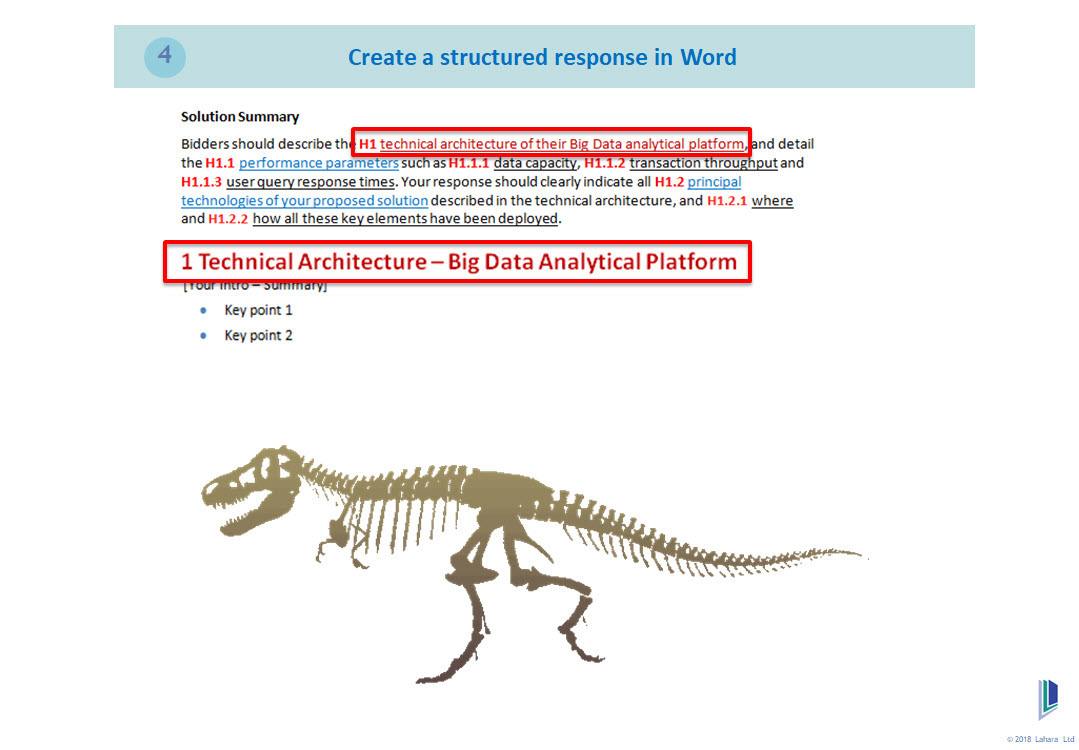
2.5 Technical Architecture – Big data analytical platform
3. Select the H1 sub-headings (in this example H1.1 and H1.2) , and copy and paste them below the H1 (level 1) heading
4. Edit these sub-headings (level 2) into a line-by-line list
5. Edit or rewrite each sub-heading if required, to shorten it, or make it read better, while preserving their original wording, or technical requirement terms, as much as possible.
6. Copy the edited sub-heading list and paste it below, to give you two sets of the list
7. Apply the answer bullets style to the first list
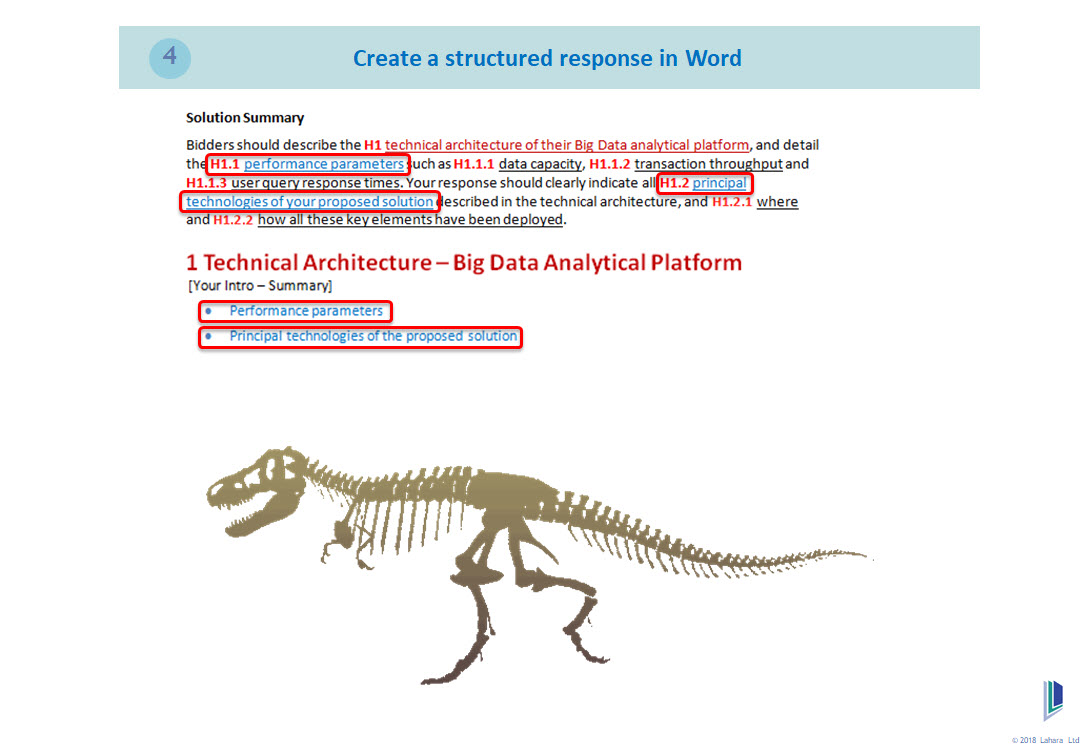
2.6 Solution Summary – Headings at Level 1
8. Take the second sub-heading list, and add a number of carriage returns after each item
9. Apply the level 2 heading style to each sub-heading
10. Do this in an orderly fashion for all of the sub-headings, i.e. any H2 and H3 headings
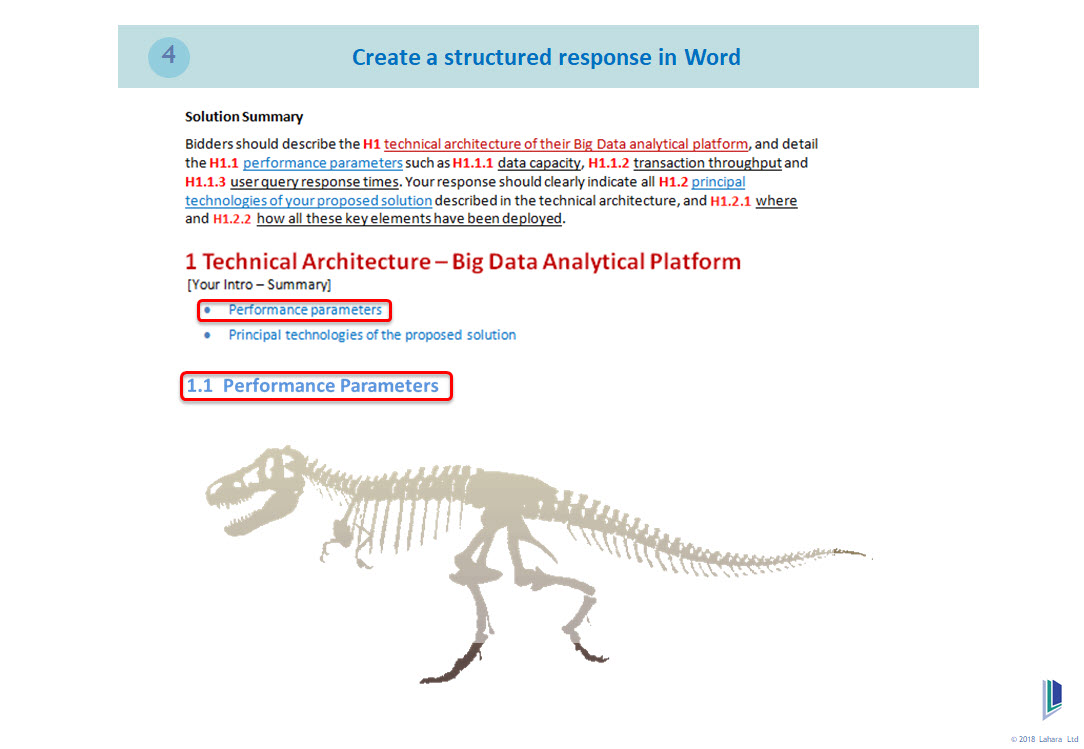
2.7 Technical Architecture – Performance Parameters
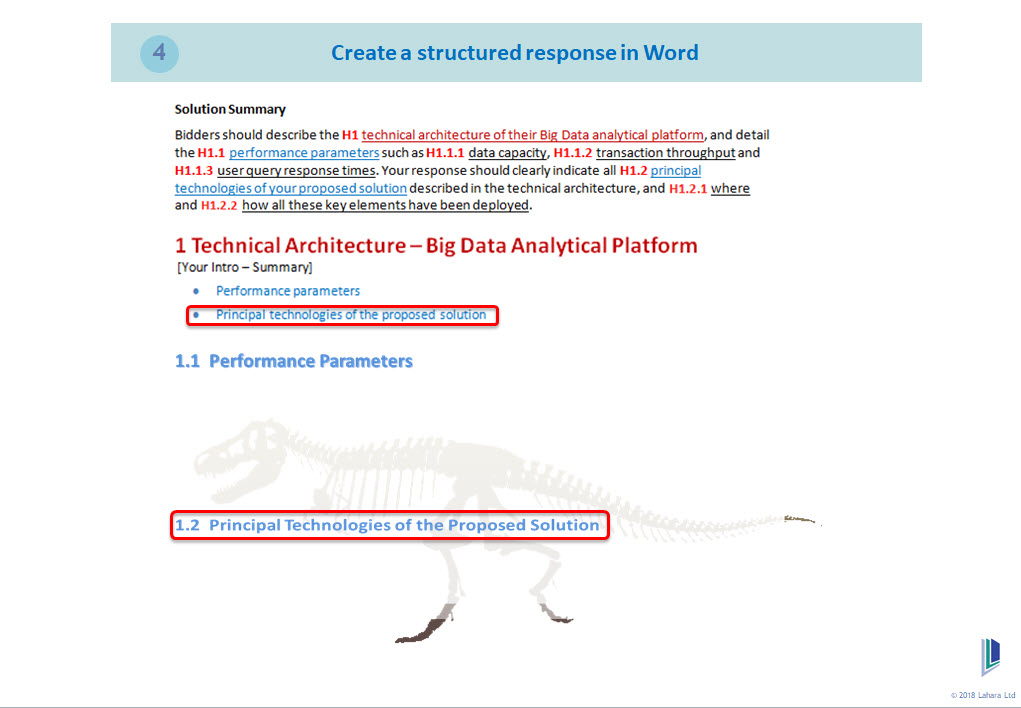
2.8 Technical Architecture – Principal Technologies of the Proposed Solution
NOTE: As the structure is gradually building, if you find that changes are needed to the headings structure and, consequently, the heading numbering:
• Go back to the set of headings shown in the graphic “3. Add in sub-heading numbers” above • Make your adjustments there • Then make your changes to the headings in the Word below
It is important to take your time and go carefully. This answer outline will become the structure for your response, and it needs to be correct.
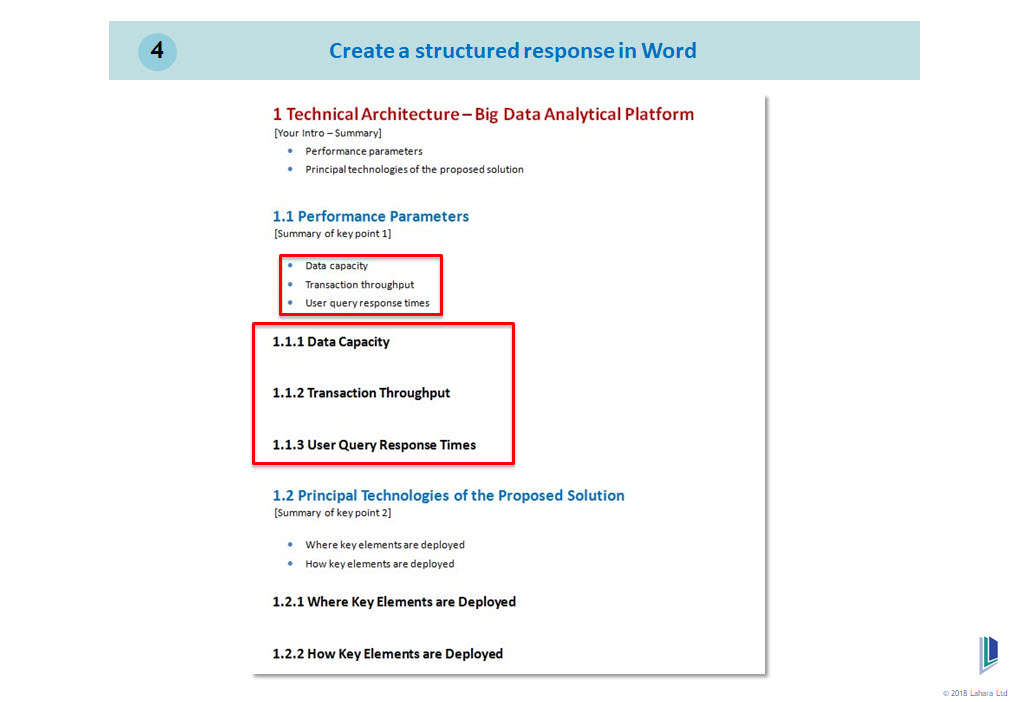
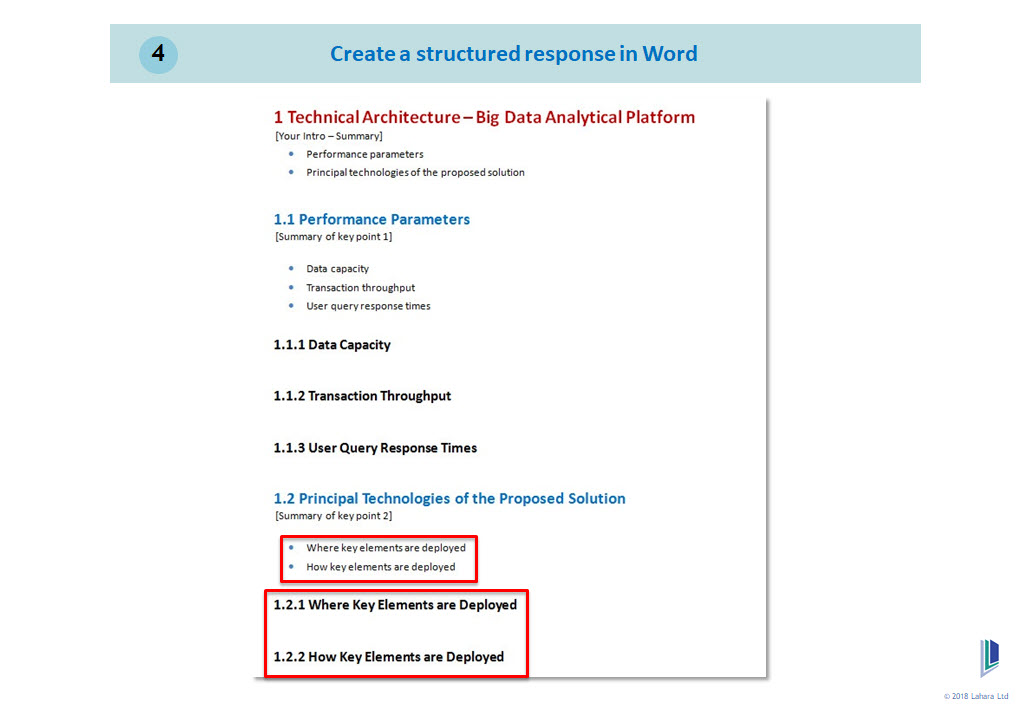
11. Now copy and paste the H1 sub-sub-heading (level 3) items below their respective level 2 sub-headings. In this example they are: H1.1.1, H 1.1.2 and H 1.1.3.
12. Edit or rewrite each sub-sub-heading if required
13. Similar to step 6 above, copy the edited sub-heading list and paste it below. This will give you two sets of the sub-sub-headings list
14. Apply the answer bullets style to the first list
15. Take the second sub-sub-heading list, and add a number of carriage returns after each item
16. Apply the level 3 heading style to each sub-sub-heading
17. Do this in an orderly fashion for all of the other sub-sub-headings, i.e. any H2.1.1. and H3.1.1 etc. headings
2.9 Technical Architecture – Data Capacity, transaction throughout and user query times
2.10 Technical Architecture – Where and how key elements are deployed
NOTE: Your answer outline template may already be set up with multiple headings – as shown below. The set of headings and bullets can be copied, and then pasted to create the required number of level 1 heading groups.
By setting these headings groups up in advance, and ensuring there are the right amount and levels to match your structure – before inputting any text, it can be a huge time saver. To input text from your set of numbered question headings:
- Copy the question’s heading text
- For a level 1 heading, select the “1 Answer Heading” text in the answer outline
- Paste special “keep text only” the text directly over the “1 Answer Heading” (this will preserve the style)
- If you keep losing the heading style, paste over just the 1 Answer Headin text, leaving out the letter “g” at the end. Then delete the “g”.
- Use the same approach for the other heading levels – i.e. paste a 1 heading over the 1.1 Key point 1 style
2.11 Answer Outline – Answer headings and adding key points and bullets
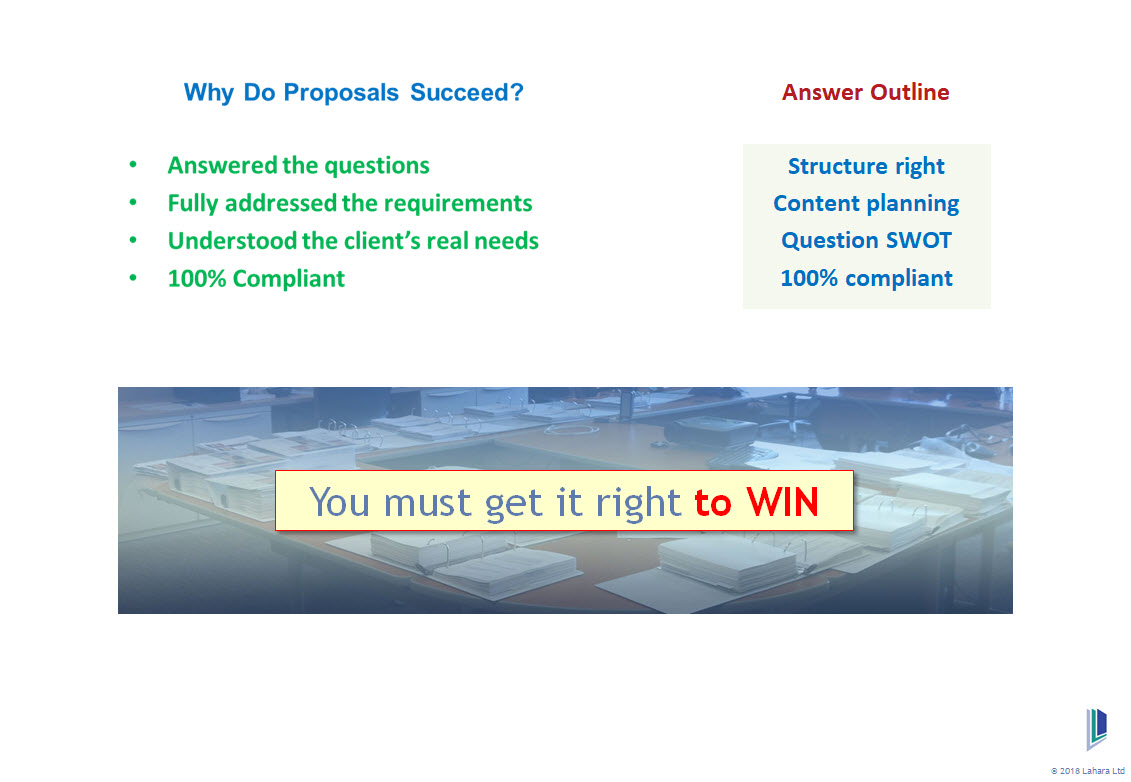
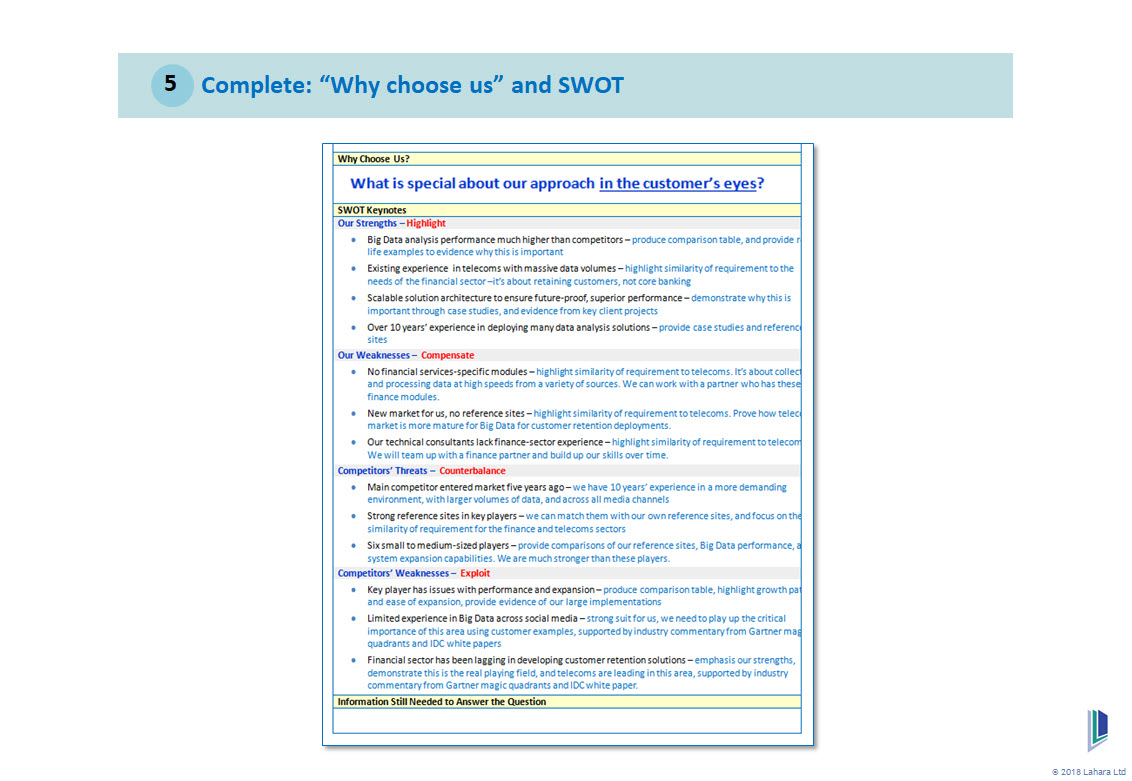
Remember to complete “Why us?” and do a SWOT. This is the time to think competitively about what you are offering, who you are likely to be up against, and what you are going to do about it.
I can promise you that if you do not do this work, it will not show up in your answer.
And the likely result will be a much weaker, seller-focused, feature-focused response. I have seen this happen time and time again when this step is skipped to “save time”.
The question to ask yourself is: Do I want to save a tiny bit of time, or increase my chances of winning more points for this answer?
2.12 SWOT – HIghlight our strengths, compensate for our weaknesses, counterbalance our competitor’s threats and exploit our competitor’s weaknesses.
Successfully creating answer outlines requires skill, discipline and organisation. It is a process, and it is essential to follow each step you have learned IF you want to get the most benefit out of it.
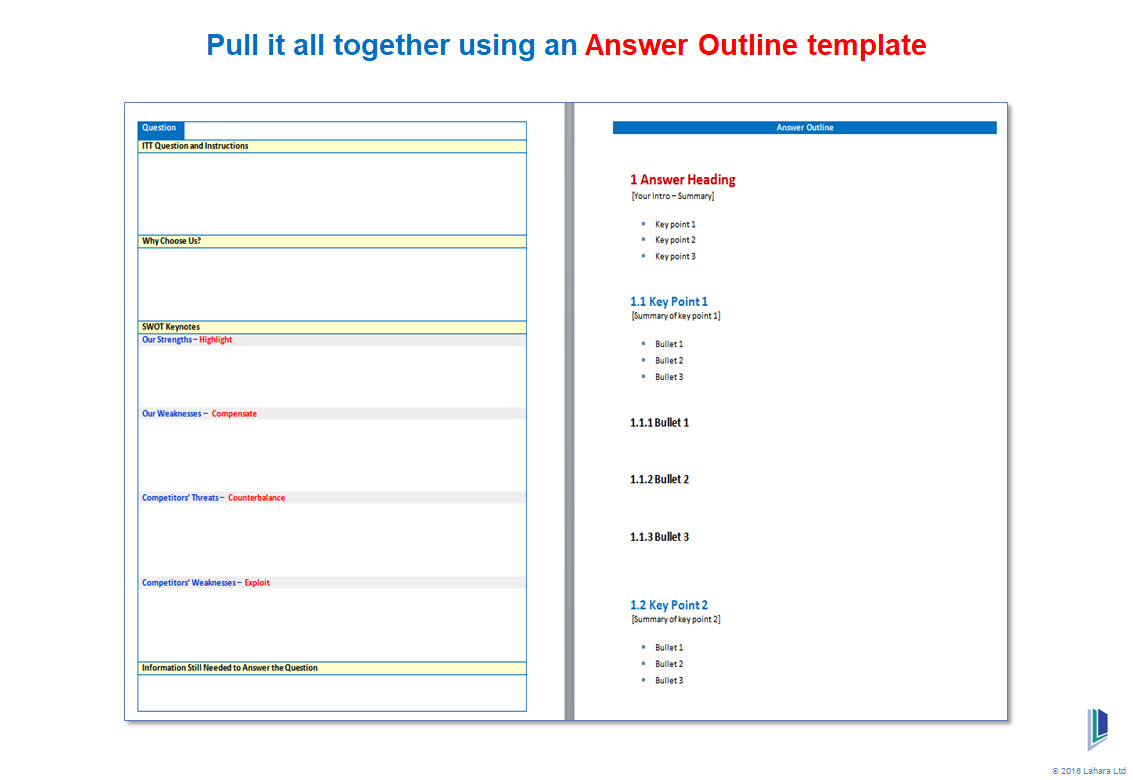
Also, it is very helpful to use an answer outline template. To assist you, we have provided downloadable a version. Click on this link for: Answer Outline Template
NOTE: If you already have a styled Word template for responding to bids, then open up a new document in your template, and paste the table on pages 1 and 2 of the answer outline template into it. This will ensure that the answer outline structures you then create will be in your chosen Word styles.
3. Constructing Your Response
Using an Answer Outline Template
Successfully creating answer outlines requires skill, discipline and organisation. It is a process, and it is essential to follow each step you have learned IF you want to get the most benefit out of it.
Also, it is very helpful to use an answer outline template. To assist you, we have provided downloadable a version. Click on this link for: Answer Outline Template
NOTE: If you already have a styled Word template for responding to bids, then open up a new document in your template, and paste the table on pages 1 and 2 of the answer outline template into it.
This will ensure that the answer outline structures you then create will be in your chosen Word styles.
3.1 Answer Outline Template – Using a tried and tested template to organise your response, giving you the best chance of gaining a high scoring answer
Here is a worked example of an answer outline.
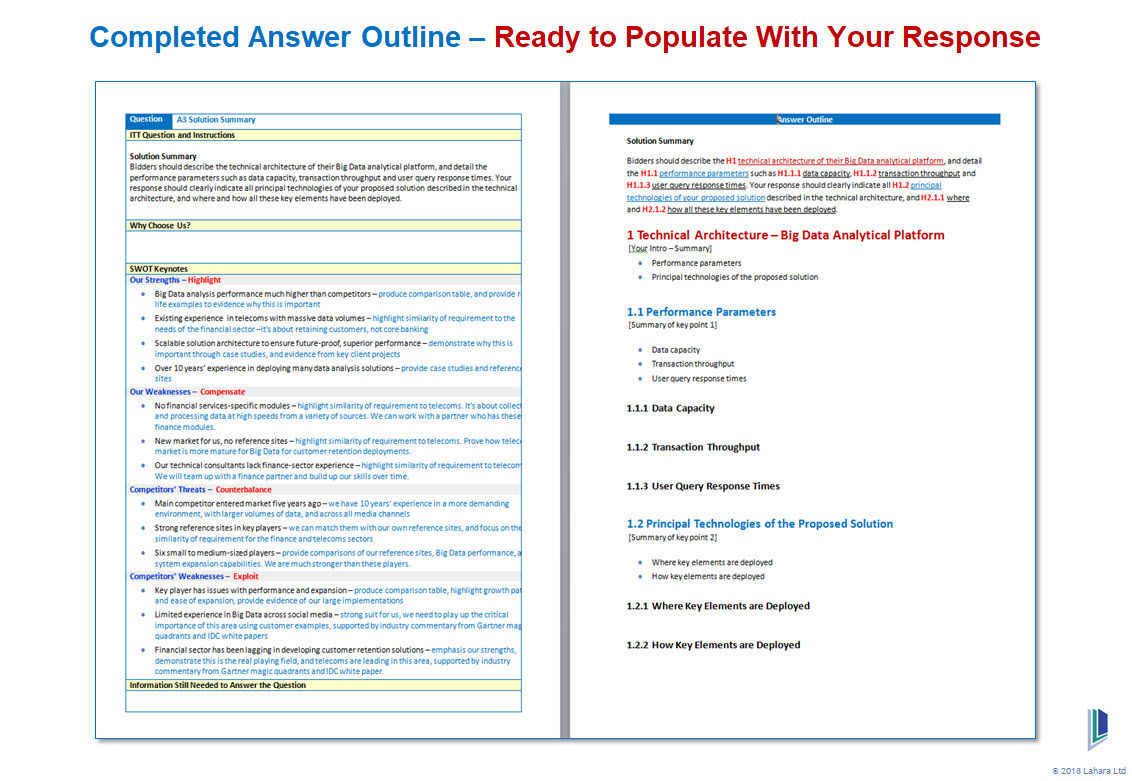
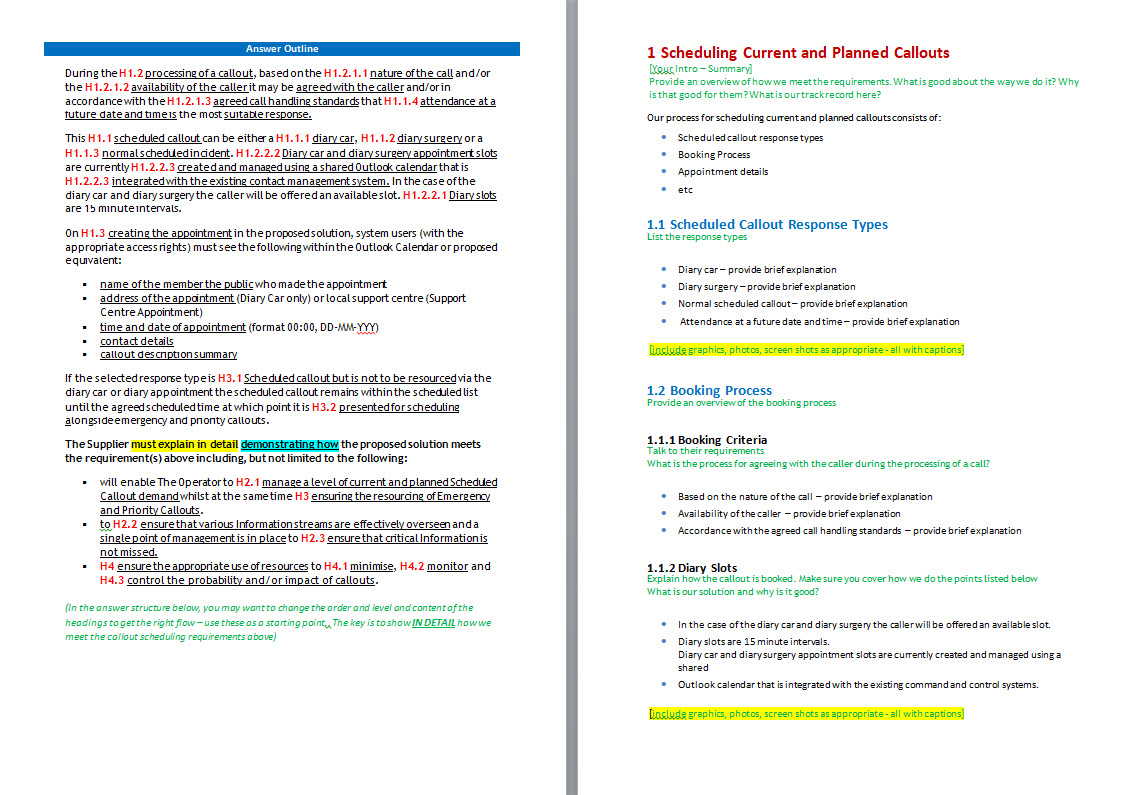
3.2 Completed Answer Outline Template – Ready to populate with your response
Please also see this downloadable example answer outline: Contact Management It is worth reading through it carefully, as it was quite a complicated question. The answer outline contains lots of suggestions for providing content, which you could apply to your own responses.
3.3 Sample Answer Outline Template – Showing headings and their numbering system
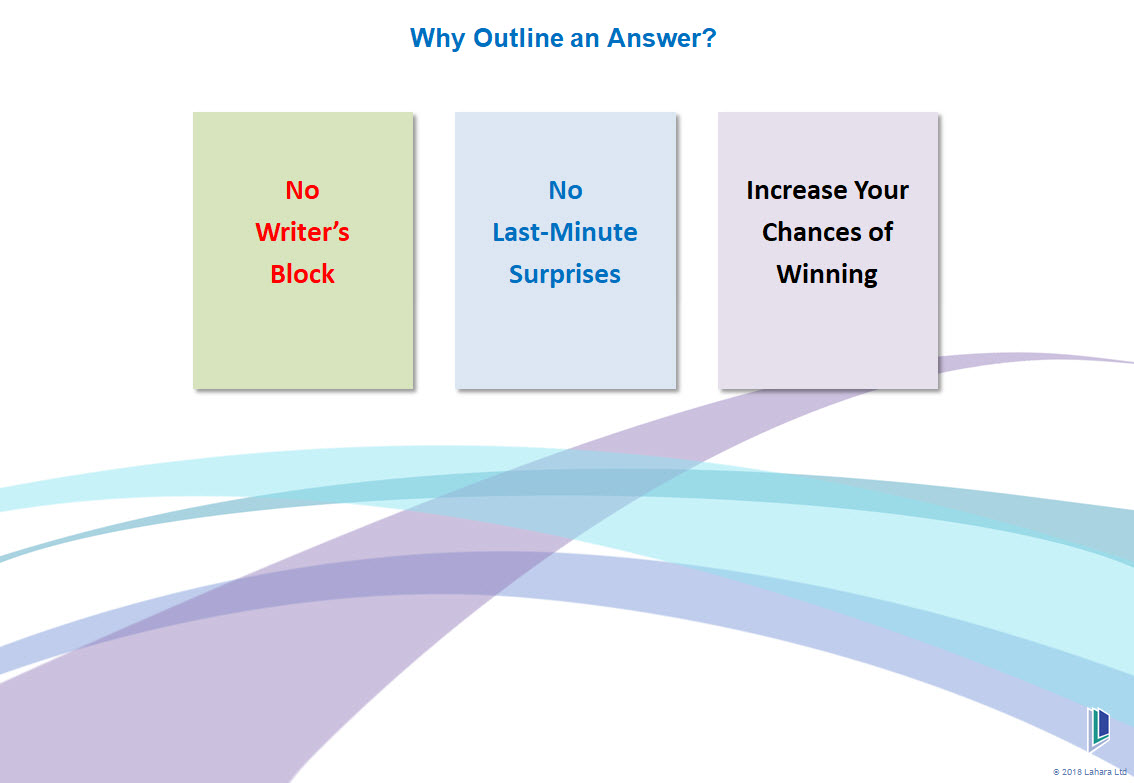
NOTE: It is always beneficial to get you answer outline reviewed – whether through a formal review process or just by asking a colleague. The correct answer structure is a huge step in ensuring you are actually answering the question. Not answering the question is one of the main reasons for achieving low scores. Getting your
answer outline reviewed BEFORE WRITING will guard against going down the wrong track and having to go through agonising, eleventh-hour revisions of your final written answer. It also is a great way to reduce writer’s block, ensuring that you are not spinning your wheels and struggling to generate your response. Your answer outline will help you:
- Produce higher quality answers
- Improve the chances of using relevant SWOT keynotes
- Reduce proposal re-work and last minute changes
- Decrease wasted writing time
Why Outline an Answer? – To help you win!